In this blog, I’ll explore server-sent events and provide some examples of how they work and can be used. Server-sent events, along with HTTP polling, WebSockets and WebTransport, is a technology that makes it possible to receive data in a client browser from a server without the need to refresh the browser manually.
Bidirectional or Unidirectional
When building apps with UIs that need to be updated automatically with new data, it’s important to understand if the app will only be feeding data one way or if there needs to be a two-way data exchange.
If the app only feeds data one-way, like with real-time scores from a sports game, a progress bar or a live dashboard, there’s no data going from the client back to the server. In these scenarios, it would be logical to select a technology where the client only fetches data from the server, like HTTP polling, or where the server only pushes data to the client, like server-sent events.
The good thing with technologies like server-sent events and HTTP polling is that they use the HTTP protocol, so there’s no need to learn a new protocol or learn how to unmask client messages, like with WebSockets, making it much easier to get started. However, if the app needs to communicate back and forth between the server and the client, like a browser-based game or a chatroom app, then WebSockets, or once the API finalizes, WebTransport over HTTP/3, would be a natural choice.
In the rest of the article, I’ll focus on unidirectional communication, like HTTP polling and more specifically, server-sent events.
HTTP Polling or Server-Sent Events
To fetch new data with HTTP polling you make AJAX requests periodically with setInterval() in JavaScript or, if the whole page should refresh, by setting the HTML header <meta http-equiv="refresh" content="2">. The connection to the server is opened and closed with every request and data is received every time a new connection is established.
In contrast, server-sent events use JavaScript to open a stream connection to the server, the server returns a response with the header Content-Type: 'text/event-stream' to establish the stream connection. This connection is kept open and used for all the data transfer until either the client or the server closes it.
The flow looks something like this:
HTTP Short Polling
------------------
1. The client opens a connection to the server.
2. Fetch data (if any).
3. Closes connection.
(Repeat from top)

HTTP Long Polling
-----------------
1. The client opens a connection to the server.
2. Fetch data (if any), otherwise keep connection open and wait for data.
3. Closes connection.
(Repeat from top)

Server-Sent Events
------------------
1. The client opens a connection to the server.
2. The server responds with the "Content-Type: text/event-stream" header.
3. Stream connection is established.
(The connection stays open until the client or the server closes it)
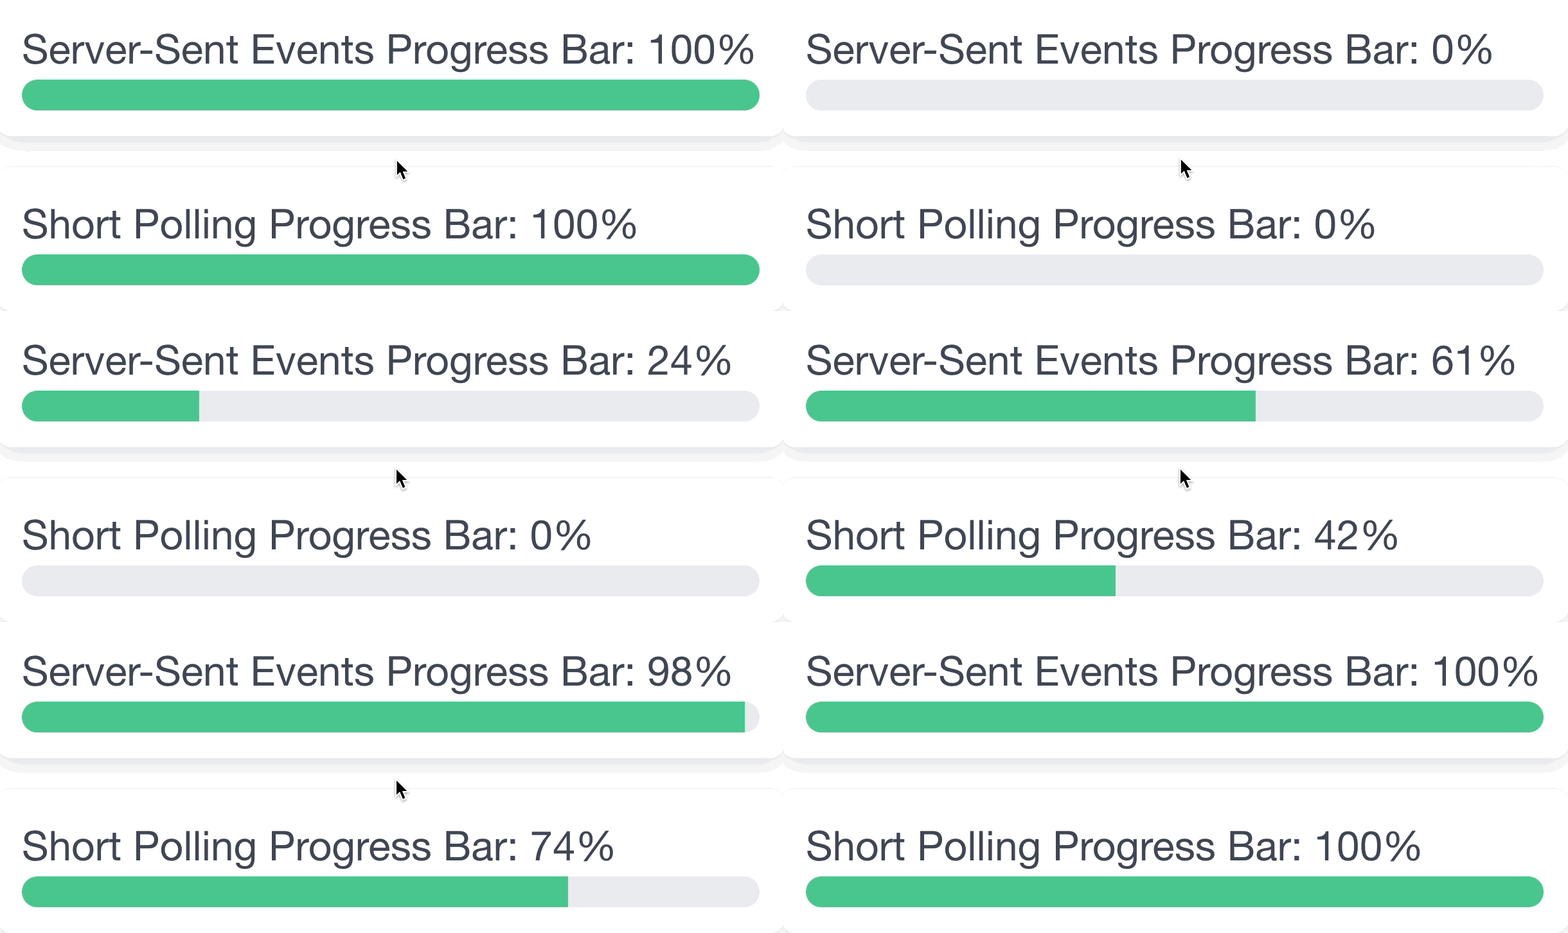
Since HTTP polling makes multiple round-trips to the server, it uses more resources and there’s more latency for the data to arrive since there’s a period between requests where the client doesn’t receive data. This won’t happen with server-sent events since the connection is kept open and data is streamed from the server to the client. Let’s look at an example of a progress bar implemented with both technologies.

In the example above, HTTP polling did 11 round-trips to the server, while server-sent events received all its data through one connection. The code for the example is located [here].
Server-Sent Events
Now that we understand how both HTTP polling and server-sent events work, let’s take a closer look at how we can set up and use server-sent events in a Laravel application. Here are two snippets, one for the client and one for the server implementation.
// Client (JavaScript)
const connection = new EventSource("/stream-endpoint");
connection.onmessage = (payload) => {
    const progress = parseInt(payload.data, 10);
    if (progress === 100) {
        connection.close();
    }
};
// Server (PHP)
public function streamEndpoint() {
$callback = function () {
// send progress 0...100 to client
foreach (range(0, 100) as $progress) {
usleep(30000); // give the browser 30ms to recover
echo 'data: ' . $progress . "\n\n";
flush();
}
};
$status = 200;
$headers = [
'X-Accel-Buffering' => 'no',
'Content-Type' => 'text/event-stream',
'Cache-Control' => 'no-cache'
];
return response()->stream($callback, $status, $headers);
}If you wonder what the X-Accel-Buffering header is, check out my previous blog on the topic of proxy buffers, [here].
The structure of the data
As seen in the example above, data is sent over the wire as text and in its simplest form contains only a data field, like so: data: sample text\n\n. All messages in server-sent events are terminated by a double new-line “\n\n” and the only required field in a message is data:. In total, there are four fields that can be set, all other fields will be ignored.
Here’s an example of how a message looks with all the fields set which also contains a multi-line data field. The data field is the only field that can be spread over multiple lines and will be concatenated in the browser once received by the client. Let’s look into each field in a bit more detail.
event: message\n
data: sample text\n
data: can be multiple\n
data: lines\n
retry: 1000\n
id: 1\n
\n
The event: field (optional)
This field is optional and if not specified, the default event name is “message”. Setting this field is very handy since it makes it easier on the client side to only listen to certain events or have different behaviors attached to different events. To add an event listener and start listening to a specific event type, register a callback like so:
connection.addEventListener('message', (payload) => {});
connection.addEventListener('score', (payload) => {});
connection.addEventListener('ping', (payload) => {});
The data: field
This is the only mandatory field and is the only one you need to send data with server-sent events. This field can be spread over multiple lines, each line prepended with data: to create multi-line messages. Data that is multiple lines will automatically be concatenated in the browser and used in the exact same way as single-line data messages.
The retry: field (optional)
This field controls how long the browser should wait until it tries to reconnect to the server when the connection is interrupted. The value needs to be an integer, specified in milliseconds. The default value depends on the browser but it’s usually 1 second or less.
The id: field (optional)
This field specifies the ID of the message that is being sent, this is very helpful when sending a sequence of messages. If the connection is interrupted between the client and the server, the client will (if id is set) automatically set the header “last-event-id” with the reconnection attempt HTTP request, containing the last received message ID.
This is very useful in order to know where you should resume the data transfer, but it can also be used if you for example only would like to send messages up to a certain ID. The server could respond with a 204 response which will force the browser from trying to reconnect to the server.
$lastMessageId = app('request')->header('last-event-id', 0);
if ($lastMessageId > 1000) {
    return response('Please stop reconnecting.', 204);
}
Dashboard example
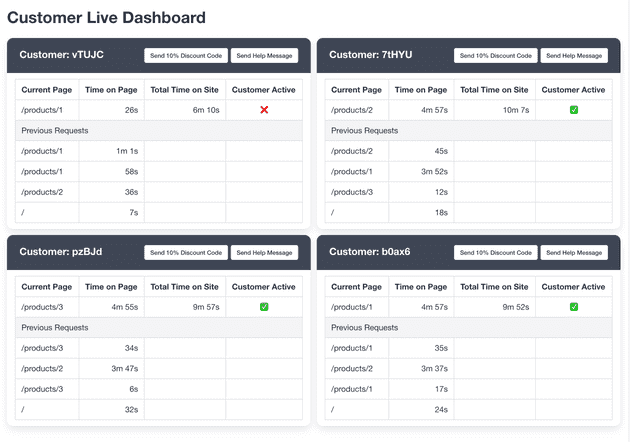
I thought I’d put together another example besides the progress bar as a fun exercise. Live dashboards with loads of data updates are really where server-sent events shine after all.
As you might have guessed from the screenshot, the app is built to track activity from customers in an e-commerce store. The client sends a ping to the server which keeps track of the activity, together with a shared cache between the client and the server to keep track of customers’ activity throughout the store.
I’ve also added a fun feature where you can send a discount code with a short validity period, aimed to nudge customers into a purchase after stalling on a product page for a long while.
If you’re interested in checking out how the app is set up, the whole source code is available [here].
Closing notes
After playing around with server-sent events for a few weeks and trying it out in various scenarios, I must say that I think it’s really great. It’s as easy to set up as HTTP polling but uses fewer resources and can handle more data. Also, the data is streamed instead of chunked into multiple requests.
When you read about server-sent events on the web, some sources mention that server-sent events are something to be careful about since they hold a connection open. This concern comes from the limitation in HTTP/1 where browsers only allow 6 simultaneous open connections towards the same domain. This means if you have 6 streams open at the same time towards the same domain, this will block other requests, like HTML, CSS, images, etc., from being loaded.
In my opinion, in 2024 (soon 2025), I think it’s fair to say that most servers use HTTP/2 and HTTP/2 has a limit of about 100 connections to the same domain, which is way more than HTTP/1’s 6 connections, so I would really say that this is a non-issue.
Another thing to keep in mind is that if nginx is set up as a load balancer, it by default uses HTTP/1.0 to proxy the requests to upstream servers. Server-sent events will need HTTP/1.1 or newer to function, so make sure that your nginx load balancer uses HTTP/1.1 by setting proxy_http_version 1.1; in your config.
One last thing, as a best practice when building apps with server-sent events is to always send a message to the client, like a ping, even if there’s no “real” data that should be sent. I’ve mentioned this in a previous article as well, located [here]. This is because PHP-FPM is unaware that the client has closed the connection or its browser until it tries to send something to the client. If you let PHP-FPM know of any idle connections you can close them as early as possible and free up resources on your servers. I’ve implemented a sample of this in this example [here].
That’s it for this time, I hope that this will be useful for someone out there looking to get more insight into server-sent events and how they can be implemented in an app built with Laravel.
Until next time, have a good one!
