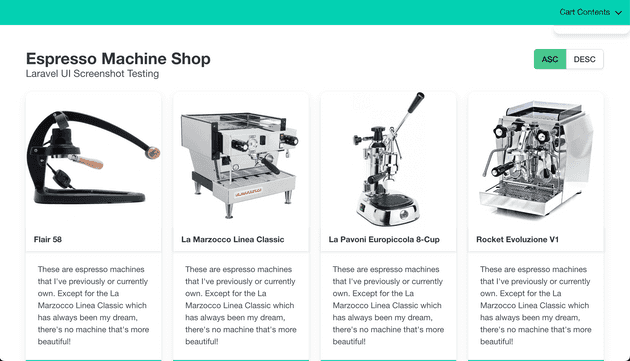
In this blog, I’ll go into the differences between snapshot and screenshot testing and show how it can be set up with an example app that I built in Laravel and htmx.
The sample app that I built for this blog post, a simple espresso machine storeBackground
For the last 10 years, I’ve been going from AngularJS to Angular to Vue.js to React, writing most of my frontend logic in some JavaScript framework.
As developers, we all know how much effort it takes to maintain packages and logic both in the frontend and backend. New features and tests need to be written both in the backend and frontend which involves context switching and juggling multiple languages and frameworks at the same time.
When I first heard about htmx, it really resonated with me how it aims to move everything back to the backend. It works by swapping out HTML fragments in the DOM from AJAX requests and its goal is to move us away from having lots of complex JavaScript code in the frontend. No more building and compiling JavaScript, you refresh your browser and the changes are there.
While I was very intrigued to try htmx out on a new project, it wasn’t first clear to me how I would test the app.
Back in 2018, when I first tried out the testing framework Jest and its snapshot testing feature, I thought that it made a lot of sense. However, snapshot testing has some shortcomings which I think screenshot testing solves nicely.
At least in my head, screenshot testing with htmx seemed like a perfect match. So, I decided to try it out by creating a sample app with Laravel and htmx that is tested through screenshot testing.
Snapshot testing
With snapshot testing, you store a static version of a rendered output in a file. This output could be from a React component or just plain HTML that is rendered in a template.
Once you have your static output stored in a file this becomes a reference point to test against every time changes in the source code are made. So, every time you run your tests, new output will be rendered and compared to the previous static output stored in a file. If there’s a difference the tests will fail, unless you choose to accept the new changes.
Snapshot testing makes it easy to detect how and where changes to the source code made changes to the final rendered output in the app. This is especially useful when you have many small nested and reused components throughout your app where changes to the source code can affect the output in places you didn’t expect.
One of the downsides of snapshot testing is that it will only store the rendered output as text. It’s therefore difficult to spot how and if the user interface was affected by the newly introduced changes to the source code. This also makes it difficult to share the changes with your UI design team since the changes are not visual.
Screenshot testing
With screenshot testing, you start a headless browser that renders your app and takes a screenshot of it. The result is a visual representation of your app stored as an image file. This makes it way easier to share changes with other people on the team who are not developers.
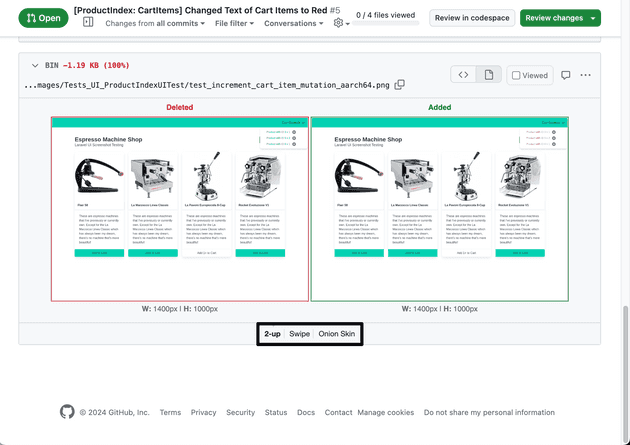
When testing with screenshot testing, new screenshots are rendered on every test run and they’re committed to your version control system, like git. If you’re pushing your code to GitHub, like I think most of us do, it makes it easy to compare differences between two images since GitHub offers functionality such as 2-up, swipe and onion skin.
GitHub PR showing how text on cart items was changed from green to red.One of the downsides of screenshot testing that I’ve encountered is that different architectures can generate screenshots that are not identical to every pixel.
In my tests, I generated screenshots on arm64 and amd64 and used ImageMagick to compare them, and even with the same version of the Chromium browser, the generated screenshots were a few pixels off each other.
When comparing the images side by side, they look identical to the human eye. However, when checking for changes on binary files, like images, we check the checksums of the two files. This means that even if only one pixel is different, the checksum of the image file is completely different.
To combat this, it’s better to stick to one architecture when generating screenshots, or if your team needs to use multiple architectures, you could generate screenshots on multiple platforms quite easily by doing something like:
docker run -it --platform linux/amd64 php php vendor/bin/phpunit
docker run -it --platform linux/arm64 php php vendor/bin/phpunit
With both snapshot testing and screenshot testing it’s important to always keep your snapshots and screenshots up-to-date with the latest changes of your app. As humans, we often forget to do things that we should’ve done, like regenerating our screenshots.
So, in my example app, I used CircleCI to set up a job that compares the checksum of the current screenshots to newly generated ones on every pushed commit to GitHub. This, combined with a protected master branch on GitHub, prevents any stale and outdated screenshots from being merged into the master branch of your GitHub repository.
Here’s an example that I made where I purposely didn’t regenerate the screenshots to test a failing CircleCI Job, check it out [here]
The sample app
To see how screenshot testing can be set up, I built a sample app with Laravel and htmx. All the files added can be seen [here]
This app uses Laravel’s session to keep track of the app state, just like you’d use redux or similar to manage the state in a JavaScript app. When you interact with the view, htmx sends an AJAX request to the Laravel backend which returns an HTML fragment that is replaced in the DOM.
I’ve divided the tests into two PHPUnit test suites, one called UI tests, one called Feature tests. UI tests are screenshots taken of the app in different states. Feature tests are tests where buttons are clicked and where there’s interaction with the app. The state is then verified to see that the app is responding correctly and updating its data accordingly.
UI Tests (Screenshot Tests)
These tests use Spatie’s Browsershot package to boot a headless instance of Chromium. This browser is pointed to a specific local URL and takes a screenshot of the rendered page.
The test itself is very short, it sets the state of the app and then takes a screenshot of it and stores it as an image file. A sample test can be found below and the logic taking the screenshot can be found [here]
public function test_add_to_cart_mutation()
{
    (new StateManager)->updateState('ProductIndex', ['add-product-id' => 2], ProductIndexMutations::AddToCart);
    session()->save();

    $this->takeScreenshot('/');
}
Feature Tests
With feature tests, we’re not taking screenshots of the rendered output and we do not need to know how the app visually looks in the browser. So for performance reasons, it doesn’t make sense to boot up a browser instance for every test.
Instead, we’ll be using Symfony’s BrowserKit component for feature tests. This library doesn’t use a browser but rather uses a DOM Crawler which loads the rendered HTML of a page and then uses XPath to fetch nodes and simulate interactions with elements by sending requests to the app.
These feature tests are also pretty simple in their structure. They make a request to a specified page to load up the HTML, click a button or submit a form, and then check the app state which is stored in the Laravel session.
public function test_sort_products_feature()
{
    $expectedSession    = [
        'sort'          => 'desc',
        'skip'          => 0,
        'take'          => 10,
        'cart'          => [],
        'products'      => [
            DataObject::product(Product::find(1)->toArray()),
            DataObject::product(Product::find(3)->toArray()),
            DataObject::product(Product::find(2)->toArray()),
            DataObject::product(Product::find(4)->toArray())
        ],
        'notifications' => []
    ];

    $this->visit('/')
        ->see('Espresso Machine Shop')
        ->submitHxFormById('#sort-products-desc')
        ->assertSessionHas('ProductIndex', $expectedSession);
}
The method submitHxFormById is a helper that I created to make it easier to send htmx requests to the backend while testing with Symfony’s Browserkit, you can check out the source code [here]
Conclusion
I believe that screenshot testing is a super powerful tool, it makes it so much easier to share what code changes made what changes to the UI.
Also, since the changes can be verified visually, it’s easier to share them with UI designers and other team members who are in charge of the user interface. This visually rendered output is something that can’t be achieved with snapshot testing.
However, like in our example app, when there’s no reason to render the page in a browser, it makes more sense to use other testing methods, like Symfony’s Browserkit that will give you better performance.
That’s it for this time, I hope that this will be useful for someone out there wondering about the differences between snapshot and screenshot testing and how it can be used in Laravel to test your app.
Until next time, have a good one!
If you’d like to try out the app on your machine, check out the sample app repo on GitHub [here]

